If you have ever been involved in a scan-to-BIM project, you know that the architectural and structural elements — walls, columns, slabs, stairs — are the straightforward part. The difficulty, the cost overruns, and the schedule delays almost always come from the same place: MEP systems.
Mechanical, electrical, and plumbing components are the most challenging category of building elements to capture with laser scanning and the most labor-intensive to model in BIM. A single commercial floor that takes 40 hours to model architecturally at LOD 300 can take 100-200 hours to model at the same LOD for MEP systems. The gap between architectural and MEP difficulty is not gradual — it is a cliff.
This article explains why MEP remains the industry’s biggest scan-to-BIM challenge, what the practical implications are for project planning and budgeting, and what approaches are emerging to address the problem.
Why MEP Is Fundamentally Harder to Scan
The Occlusion Problem
Laser scanners capture what they can see. In an open floor plan with exposed structure, the scanner has clear sightlines to walls, columns, and slabs. MEP systems, by contrast, create dense layers of obstructions that block the scanner’s view.

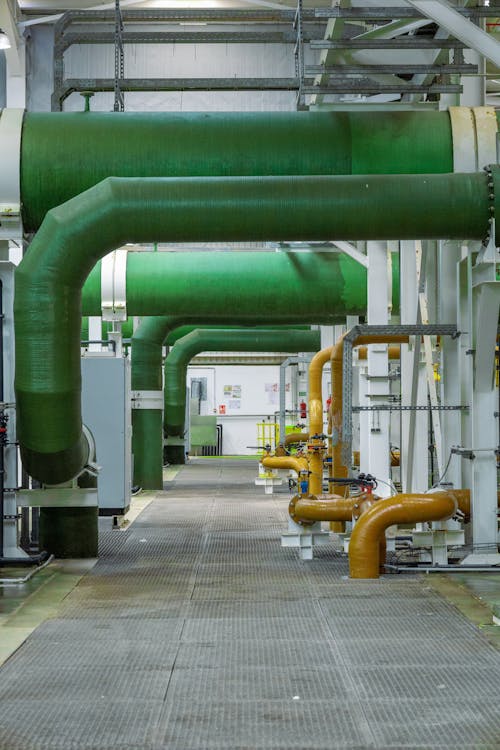
Consider a typical commercial ceiling plenum:
- Large ductwork runs along the primary routes, blocking the view of anything behind it
- Branch ductwork feeds off the mains at various angles, creating additional obstructions
- Piping systems (domestic water, fire protection, condensate, chilled/hot water) weave between and around the ductwork
- Electrical conduit and cable trays occupy whatever space remains
- Hangers and supports connect everything to the structure above
From any single scan position, the scanner sees only the front-facing surfaces of the MEP components nearest to it. The components behind — the second and third layers of ductwork, the piping that runs along the far side of a main duct, the conduit that passes behind a pipe rack — are occluded (hidden) from the scanner’s view.
The result is incomplete capture. Even with aggressive scan positioning (many positions, close to the MEP systems), there are always areas that no scan position can see because they are physically blocked by other components.
Small Component Size
Architectural elements are large: walls are measured in feet, columns in inches of cross-section. MEP components span an enormous range of sizes:
- Large ductwork: 12” x 48” rectangular ducts are easy to capture
- Small ductwork: 6” round branch ducts are captured but with fewer surface points
- Large piping: 4-6” supply/return pipes scan reasonably well
- Small piping: 3/4” to 1-1/2” domestic water and condensate lines are at or below the reliable capture threshold for most scanning distances
- Electrical conduit: 1/2” to 2” conduit is difficult to capture with sufficient point density from typical scanning distances
- Fire sprinkler heads and branch lines: 1” pipe with small heads — barely captured unless the scanner is positioned very close
The smaller the component, the fewer points land on its surface, and the harder it is to identify in the point cloud. A 1” pipe at 10 meters from the scanner may have only a few points on its surface — not enough to reliably distinguish it from noise.
Pipe Routing Ambiguity
Even when piping is captured in the point cloud, tracing its routing is one of the most challenging interpretation tasks in BIM modeling. Pipes run horizontally, turn vertically through floor penetrations, branch at tees and elbows, and connect to equipment at various orientations. In a dense MEP ceiling, determining which pipe segment connects to which — and what system each pipe belongs to — requires careful interpretation that the point cloud alone cannot fully resolve.
The scanner captures surface geometry. It does not capture:
- What is inside a pipe (water, steam, refrigerant, drainage)
- Whether a pipe is insulated or not (insulated pipes appear as larger cylinders)
- What system a pipe belongs to (domestic hot water vs. chilled water vs. fire protection)
- The direction of flow
- Connection details at equipment
All of this information must be inferred by the BIM modeler based on context, pipe sizing, routing logic, and building system knowledge. This is why MEP modeling takes so much longer than architectural modeling — it is not just geometry, it is interpretation.
LOD Requirements and Their Impact on MEP
The Level of Development (LOD) specification has an outsized impact on MEP scan-to-BIM scope and cost.
LOD 200: Generic MEP
At LOD 200, MEP elements are modeled as generic geometry — approximate sizes and locations. Main ductwork runs and major piping are represented, but exact routing, connections, and branch lines are simplified or omitted.
Modeling effort: Moderate. The modeler traces the major visible runs and estimates sizes. Small components are typically excluded. This level is suitable for space planning and general facility documentation.
LOD 300: Specific MEP
At LOD 300, MEP elements are modeled with accurate dimensions, routing, and type identification. Ductwork includes size, shape, and connection geometry. Piping includes diameter, routing, and fitting locations. Equipment is modeled with manufacturer-specific dimensions.
Modeling effort: High. The modeler must trace every visible component, identify its type and size, and model it accurately. This is where the occlusion problem creates the most difficulty — components that are partially or fully occluded must be inferred or flagged as incomplete.
LOD 350: Coordination-Grade MEP
LOD 350 adds clearance requirements, support details, and sufficient detail for MEP coordination. This is the level required for clash detection and coordination with other trades.
Modeling effort: Very high. Every component must be modeled with correct size, routing, connections, and clearances. Support structures (hangers, brackets, trapeze) are included. The modeler often needs to make assumptions about occluded areas based on engineering logic.
LOD 400: Fabrication-Grade MEP
LOD 400 includes detail sufficient for fabrication — exact fitting types, manufacturer-specific components, and installation-level detail.
Modeling effort: Extremely high and often impractical from scan data alone. The point cloud does not capture the level of detail needed for LOD 400 (fitting types, internal configurations, gasket details). LOD 400 MEP models typically require supplementary information from as-built drawings, shop drawings, or physical inspection.
Cost Implications
The cost differential between architectural-only and MEP-inclusive scan-to-BIM is substantial.
Scanning Cost Impact
MEP documentation increases scanning costs in several ways:
- More scan positions required — Dense MEP environments require the scanner to be positioned closer to the ceiling and in more locations to minimize occlusion. A floor that needs 40 positions for architectural documentation may need 80-120 positions for comprehensive MEP capture.
- Ceiling access required — Suspended ceilings must be opened (tiles removed) in areas where MEP documentation is needed. This requires coordination, labor for ceiling tile removal/replacement, and often after-hours access.
- Longer field time — More scan positions and access coordination extend the field schedule.
Modeling Cost Impact

The modeling cost impact is even more significant. Using industry baseline LOD pricing from BIM firms (LOD 200 at $0.15-$0.25/sqft, LOD 300 at $0.25-$0.45/sqft), the multiplier effect of adding MEP is dramatic:
| Scope | Relative Cost vs. Arch-Only LOD 200 |
|---|---|
| Architectural only, LOD 200 | 1x baseline |
| Architectural only, LOD 300 | 1.5-2x |
| Architectural + MEP, LOD 200 | 2-3x |
| Architectural + MEP, LOD 300 | 3-4x |
| Architectural + MEP, LOD 350 | 4-6x |
| Full MEP, LOD 350-400 | 6-10x |
Adding MEP at LOD 300 roughly triples the total modeling cost compared to architectural-only at LOD 200. At LOD 350, the multiplier reaches 4-6x. These are industry-wide averages — complex industrial facilities with dense piping can push even higher.
These are estimated market rates for third-party CAD/BIM conversion — not THE FUTURE 3D services or quotes; no guarantees. THE FUTURE 3D delivers the MEP-ready 3D scan data (point clouds); the BIM modeling itself is performed by your team or a third-party BIM firm.
Budget Planning Guidance
For project teams planning a scan-to-BIM project that includes MEP:
- Define MEP scope precisely — Which systems need to be modeled? All MEP, or only specific systems (e.g., HVAC ductwork but not electrical conduit)?
- Define MEP LOD separately from architectural LOD — It is common and practical to specify LOD 300 for architecture and LOD 200 for MEP. The LOD does not need to be uniform across all systems.
- Identify priority areas — Not every room needs the same level of MEP documentation. Mechanical rooms, main distribution corridors, and coordination-critical areas may justify LOD 300-350 while secondary spaces receive LOD 200.
- Budget for unknowns — MEP modeling almost always takes longer than initial estimates. Include a 15-25% contingency for MEP scope.
Use our cost calculator to estimate scanning costs for MEP-heavy projects, and review our guide on how 3D scanning works to understand the scanning process that produces MEP-ready point cloud data.
Emerging Solutions

AI-Assisted Pipe and Duct Detection
Artificial intelligence is beginning to address the MEP challenge. Several software platforms now offer automated detection and classification of cylindrical objects (pipes and round ducts) in point clouds. These tools can:
- Identify cylindrical shapes and estimate diameters
- Trace pipe and duct runs across multiple scan positions
- Classify components by estimated size ranges
- Generate preliminary 3D pipe/duct centerline models
The technology is promising but not yet reliable enough for production MEP modeling. Current AI tools achieve 60-80% accuracy on main runs and significantly lower accuracy on small-diameter components, branch connections, and areas with heavy occlusion. They work best as a modeling accelerator — generating a starting point that a human modeler refines — rather than a replacement for human interpretation.
For more on where AI stands in the scan-to-BIM pipeline, see our article on AI in point cloud to BIM conversion.
Mobile and Drone Scanning for MEP Access
Mobile scanners (NavVis VLX3, Leica BLK2GO) and compact drones are being used to access MEP-dense areas that are difficult to reach with terrestrial scanners:
- Mobile scanners can be carried into tight mechanical rooms and along MEP corridors where tripod setup is impractical
- Indoor drones can fly above suspended ceilings to capture MEP from above, reducing occlusion
The tradeoff is accuracy — mobile scanners and drones capture at lower accuracy (5-15mm) than terrestrial scanners (1-3mm). For MEP documentation at LOD 200, this accuracy is usually acceptable. For LOD 300+, terrestrial scanning remains necessary for critical areas.
Hybrid Scan + As-Built Drawing Approach
In many existing buildings, as-built drawings from the original construction exist (even if they are decades old and may not reflect all modifications). A practical approach combines:
- Point cloud data for accurate current-condition geometry
- Historical as-built drawings for system identification, material types, and routing logic that the point cloud cannot capture
- Field verification for critical points where the drawings and scan data conflict
This hybrid approach is often more cost-effective than attempting to extract all MEP information from the point cloud alone.
Practical Tips for MEP Scan-to-BIM Projects

1. Open Ceilings Strategically
You do not need to remove every ceiling tile in the building. Identify the main MEP corridors and mechanical rooms where the critical systems run, and open those areas. Secondary spaces with minimal MEP (individual offices, restrooms) can often be documented without ceiling removal, accepting that above-ceiling MEP will not be captured.
2. Photograph Everything
During scanning, take extensive photographs of MEP areas — especially labels, nameplates, valve tags, and system identification markers. The point cloud captures geometry but not text. A photo of a pipe label that reads “CHW-S-4” tells the modeler that the 4-inch pipe is a chilled water supply line — information that would take significant detective work to determine from the point cloud alone.
3. Bring an MEP Engineer to the Field
If possible, have an MEP engineer present during field scanning (or available for a walkthrough). Their system knowledge helps the scanning team prioritize coverage areas and document system identification that the modeler will need later.
4. Define Clear Scope Boundaries
Specify exactly which MEP systems are in scope, at what LOD, and in which areas. A scope statement like “all MEP systems, LOD 300, entire building” is a recipe for budget overruns. A statement like “HVAC ductwork LOD 300 on floors 2-5, fire protection LOD 200 building-wide, electrical excluded” is actionable and budgetable.
5. Accept Incompleteness
No scan-to-BIM MEP model is 100% complete. Occlusion guarantees that some components will not be captured, and some captured components will be ambiguous. The professional standard is to model what is visible and clearly identifiable, and to document areas of uncertainty. A 90% complete MEP model delivered on time and on budget is more valuable than a quest for 100% completeness that doubles the cost.
Frequently Asked Questions
Is it possible to scan MEP systems above a ceiling without removing ceiling tiles?
Not reliably. If ceiling tiles are in place, the scanner captures the ceiling surface, not what is above it. Some thermal imaging can detect the presence of hot/cold pipes behind ceilings, but this does not provide the geometric data needed for BIM modeling. For MEP documentation, ceiling tiles must be removed in the areas of interest.
How does insulation affect MEP scanning?
Insulated pipes and ducts scan as cylinders with the insulation diameter, not the pipe/duct diameter. The modeler must estimate the actual pipe size based on the insulated diameter and knowledge of typical insulation thicknesses. This adds interpretation time and potential for error, particularly when insulation thickness varies by system and pipe size.
What if we only need MEP documentation in specific areas?
This is a common and practical approach. Scanning and modeling MEP in mechanical rooms, main distribution corridors, and coordination-critical areas while excluding secondary spaces can reduce MEP scope (and cost) by 50-70% while still capturing the most valuable information.
How does scan-to-BIM MEP compare to traditional field measurement?
Scanning captures MEP geometry faster and more comprehensively than manual field measurement, but interpreting the data is more complex. Manual field measurement by an MEP engineer is slower but produces system-identified data from the start. For large buildings, scanning is more cost-effective. For small, targeted documentation (a single mechanical room), manual measurement may be comparable.
Can we use the MEP scan data for clash detection without full BIM modeling?
Yes, to a degree. The point cloud itself can be overlaid against a proposed design model in Navisworks or similar coordination software to identify where proposed elements conflict with existing conditions. This is less precise than model-vs-model clash detection but significantly faster and cheaper than full MEP BIM modeling.
Need comprehensive scan data for an MEP-intensive project? Get a quote from THE FUTURE 3D. We deliver BIM-conversion-ready point cloud data optimized for MEP documentation — including strategic scan positioning and ceiling access coordination that minimizes occlusion. Learn more about our 3D laser scanning services and scan-to-BIM data delivery.
Ready to Start Your Project?
Get a free quote and consultation from our 3D scanning experts.
Get Your Free Quote